Get Off to a Great Start

Learning Session 2
In this learning session, you’ll find:
Estimated Time for this Session: 8 - 10 min.

First, Recognizing Your Hearing Aid Model
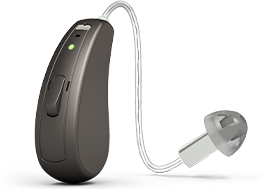
Hearing Aid Components
|
|
The Push Button Use to change volume, select programs and activate streaming to accessories. |
|
|
Microphones (2) Located at the top of the hearing aid body, each microphone picks up sounds from either behind or in front of you. 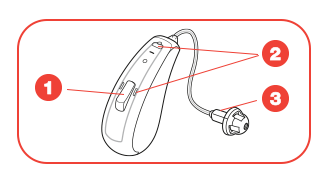 |
|
|
Receiver
The speaker that produces the sound you hear, the receiver is protected by the rubber dome, which also helps secure a comfortable fit in your ear canal. |
Using the Push Button
Turn Ona and Off
Press and hold for 5 seconds.
Switch Programs
Example: 1 beep indicates program 1, 2 indicates program 2, etc.
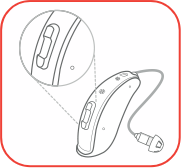
Activate Streaming
Upon activating streaming, you'll hear a short melody after which you can stream sound from a TV streamer, extra microphone or other accessory.
Activate Flight Mode
Use this feature during airplane flights to enjoy premium hearing without interfering with plane electronics. Deactivate flight mode by turning your hearing aids off and on.
Changing Volume and Programs
The functions listed below are the default settings for the multi-function button.
Please Note: If your hearing care professional has customized your multi-function button specifically to you, the instructions below might not apply to you.
Adjust Volume
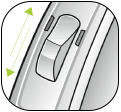
Switching Programs

Activate Streaming
Program Choices
|
|
All-Around The All-Around program is designed to give you optimal sound amplification across the many different situations you encounter throughout your day. Situation: Your day-to-day routine. This program is activated by default when you turn on your hearing aids. |
|
|
Restaurant The Restaurant program improves speech clarity and reduces background noise in busy environments. It specifically enhances speech and sounds coming from in front of you, making it easier to follow the conversation at your table. Situation: Sitting with other people at restaurants, coffee meetups, meetings and appointments. |
|
|
Outdoor The Outdoor program focuses on wind and noise reduction while still keeping you aware of your surroundings, For example, you remain aware of cars, bikes, and others around you. Situation: Outdoor walks, cycling, hiking, jogging, or even driving your car. |
|
|
Music The Music program helps to optimize your listening experience by enhancing the details of the lower, middle, and higher notes. Situation: Listening to any form of recorded or music, as well as singing or performing music yourself. |
Identifying the Left from the Right
To avoid grabbing the wrong hearing aid by mistake, the left one is marked with a blue indicator at the bottom of the hearing aid.
Your right hearing aid is marked with a red indicator at the bottom of the hearing aid.
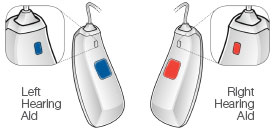
Why is this important?
If you have two hearing aids, they may be tuned differently to give you the best sound amplification according to the specific hearing loss in each ear.
How to charge the battery
|
|
Good to know Once fully charged, the battery on your hearing aid should last up to 30 hours. Even if you use streaming 50% of the time — from your smartphone or TV — you can expect up to 24 hours of battery life. |
Good Questions for Your Hearing Care Professional
Your hearing care professional may have written down important details about your hearing aid and how it has been configured. If you’re not clear on something, here are some good questions to ask:
Which programs are on my hearing aid? What are programs 1, 2 and 3?
How is my multi-function button configured? How do I change programs?
Have a suggestion?
Please offer your feedback or suggestions. They will be read and valued.
Thank you for your suggestion.
Congratulations on completing your second
Great Start learning session.
In a few days, you’ll receive an email with a link to your next learning session. If you have question, please contact your Beltone Hearing Care Professional
Missed a session? Want to keep learning now? No problem.
Learning Session 1 - Begin Your Great Start Here